- Active
- April 12, 2025
- Blk 334, Woodlands s...
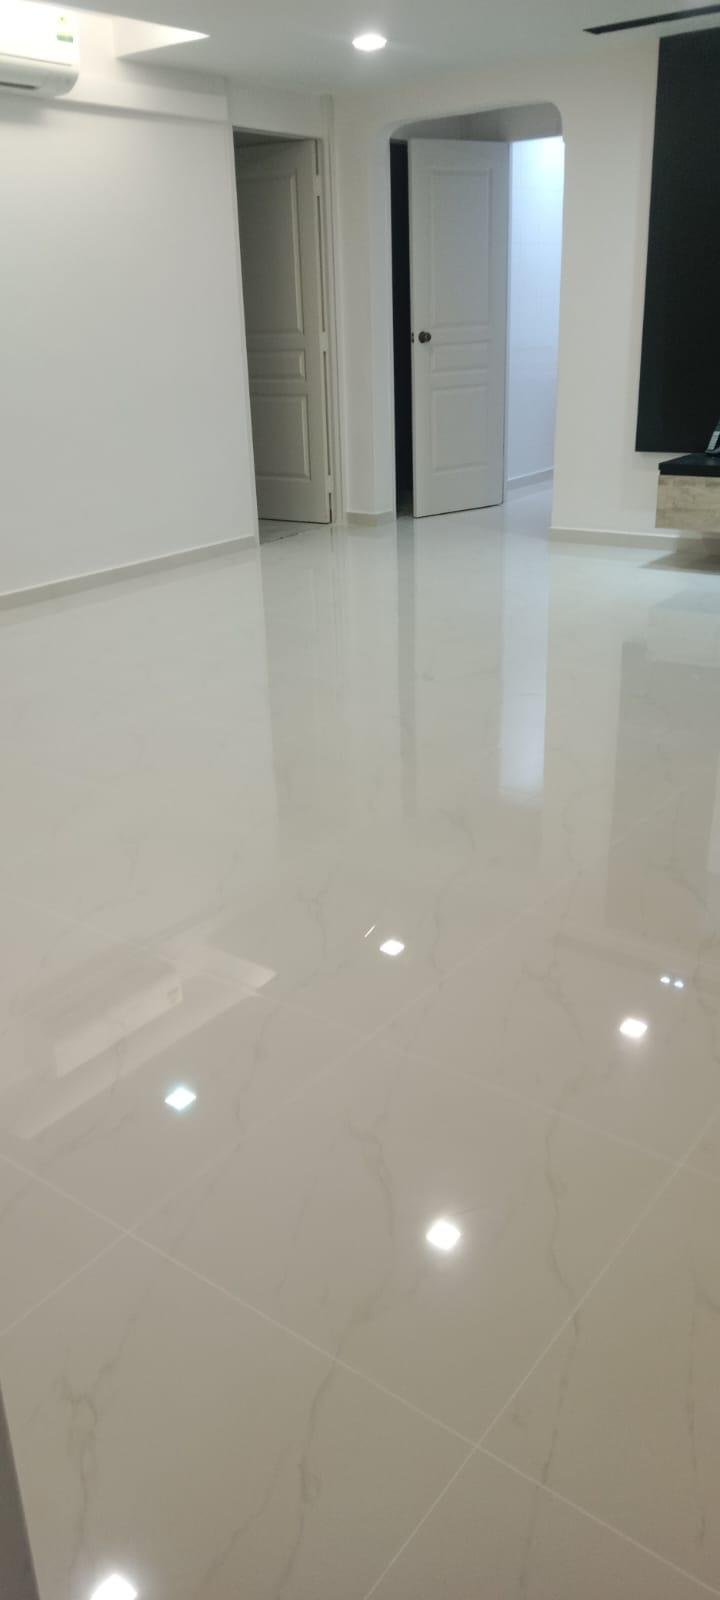
Hacking Old Tiles and proceed Homogeneous tiles(Polishing Included) and Vinyl Flooring.
Our client contacted us after experiencing tile popping issues in their living room. Upon inspection by our expert project manager and team, we identified that the problem extended beyond the living area and explained the reasons to the client before proceeding with the necessary documentation. Once approvals were in place, we commenced work by obtaining the required HDB permit for hacking and disposal.
The existing tiles were carefully hacked and removed, followed by proper disposal in compliance with HDB regulations. After clearing the site, we prepared the surface by cleaning and leveling it, then applied W1 Cement Strengthener to improve adhesion. Screeding was performed using Davco Floor Screed ECO, achieving a thickness of 20–40mm to ensure a strong and even surface. We utilized a Laser Marker and leveling tools to maintain accuracy, allowing the screed to cure for at least 24 hours before proceeding with tile installation.
For homogeneous tile installation, we ensured the screed was fully dry before applying E-Mix Tile Fix 303, mixed with water using an Electric Mixer with Paddle to achieve a smooth consistency. The adhesive was spread evenly with a Notched Trowel at a thickness of 10–15mm, and tiles were placed carefully using Tile Spacers to maintain uniform gaps. A Laser Marker was used for precise alignment, and a Rubber Mallet was used to make necessary adjustments.
After laying the homogeneous tiles, we cleaned all tile joints and applied Davco®️ Sanitized Coloured Grout ECO (CFG), mixed to a lump-free consistency using an Electric Mixer with Paddle. Grout was applied using a Rubber Float, with excess removed and the surface cleaned using a damp sponge and clean cloths. To ensure a secure bond, we conducted a Hammer Test, tapping tiles to detect any hollow sounds and addressing them accordingly.
Once the tile installation was complete, we carried out homogeneous tile polishing to enhance the surface finish, achieving a sleek and refined look. This step not only improved the aesthetics but also made the flooring easier to maintain.
Additionally, the client requested vinyl flooring installation for three bedrooms. We began by ensuring the subfloor was clean, dry, and level. A self-leveling compound was applied where necessary to create a smooth base. We used a high-quality adhesive for secure bonding and carefully aligned the vinyl planks for a seamless finish. The planks were cut to fit precisely around corners and edges, ensuring a professional appearance. A roller was used to press down the planks firmly, eliminating air pockets and ensuring maximum adhesion. Finally, we applied finishing trims along the edges and performed a quality inspection to ensure a flawless result.
Throughout the project, we used premium materials such as Davco Floor Screed ECO, W1 Cement Strengthener, E-Mix Tile Fix 303, Davco®️ Sanitized Coloured Grout ECO (CFG) for tiling, and high-quality vinyl planks with strong adhesive for the bedrooms. Professional tools such as an Electric Mixer with Paddle, Notched Trowel, Rubber Mallet, Tile Spacers, Laser Marker, Grout Float, and Flooring Roller were used to ensure precision and durability.
The project was successfully completed, delivering a flawless homogeneous tile and vinyl flooring installation that was both durable and visually appealing. Our professional approach and the use of premium materials ensured long-lasting results.
- Active
- April 12, 2025
- 164C Rivervale Cresc...
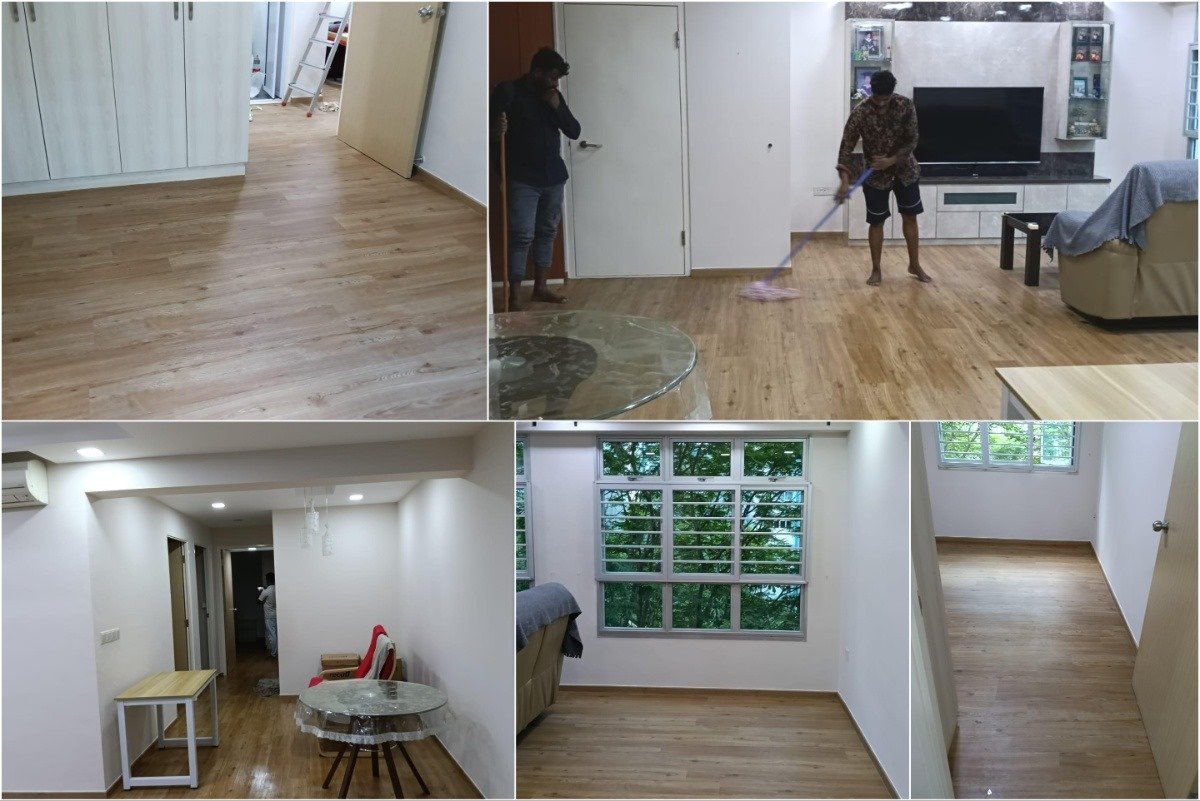
Hacking Old Tiles and proceed Vinyl Flooring For Living room and 3 Bed rooms
Our client contacted us after experiencing tile popping issues in their living room. Upon inspection by our expert project manager and team, we identified that the problem extended beyond the living area and explained the reasons to the client before proceeding with the necessary documentation. Once approvals were in place, we commenced work by obtaining the required HDB permit for hacking and disposal. The existing tiles were carefully hacked and removed, followed by proper disposal in compliance with HDB regulations.
After clearing the site, we prepared the surface by cleaning and leveling it thoroughly. W1 Cement Strengthener was applied to improve adhesion, and screeding was performed using Davco Floor Screed ECO, with a thickness of 20–40mm to ensure a strong and even surface. We utilized Laser Markers and leveling tools for accuracy. After curing the screed for a minimum of 24 hours, we applied a self-leveling compound where needed to achieve a smooth base for floor finishing.
Following the preparation, vinyl flooring was installed throughout the living room and three bedrooms. We ensured the subfloor was clean, dry, and leveled. Using a premium-grade adhesive, we laid the vinyl planks with care, achieving a seamless appearance. Each plank was cut precisely around corners and edges, and a flooring roller was used to secure the planks in place, removing air bubbles and maximizing adhesion. Finishing trims were installed at the edges, and a final quality inspection confirmed the flawless result.
In addition to flooring, the project also included full HDB interior painting works. This process began with careful surface cleaning and patching to ensure a smooth base. We applied one coat of high-quality wall primer to seal and prepare the surfaces, followed by two coats of premium top coat paint for full, even coverage and a fresh, long-lasting finish. All areas, including walls, ceilings, and corners, were painted with precision to restore a clean and vibrant look to the entire home.
Throughout the project, we used top-tier materials, including W1 Cement Strengthener, Davco Floor Screed ECO, self-leveling compound, strong vinyl adhesive, premium vinyl planks, and professional-grade primer and top coat paints. Our team worked with professional tools such as Electric Mixers with Paddle, Laser Markers, Flooring Rollers, and precision painting equipment to ensure a high standard of workmanship.
The project was successfully completed, delivering a clean, modern, and durable transformation with long-lasting vinyl flooring and a refreshed painted interior.
Looking for a dependable team for flooring, surface preparation, and full HDB painting services? Contact us today for expert consultation and quality work you can trust!

- Active
- April 29, 2025
- blk 229 Tampines Str...
Restore Your Space with Seamless Tile Repairs – Clean, Durable & Professionally Done!
At Tech Pay Solutions, we turn damaged floors into beautiful, long-lasting surfaces with quality you can trust. Our client at Tampines Street 23 engaged us to repair their living room flooring, and we completed the project with precision and care — from removal to final tile finish.
Scope of Work Completed:
- Hacked and disposed of existing living room floor tiles (180 sqft) with HDB permit compliance.
- Applied waterproofing and performed floor screeding where required (180 sqft) to ensure proper levelling.
- Supplied and installed brand-new living room floor tiles (180 sqft) with strong bonding and clean finishing.
The project was completed efficiently, delivering a smooth and refreshed living space. Our client was very pleased with the professional handling, site cleanliness, and excellent tile finish.
Have popped or damaged tiles at home? Choose Tech Pay Solutions — trusted experts in tile repairs and reinstallation done right.
- Active
- April 29, 2025
- 452 Choa Chu Kang Av...
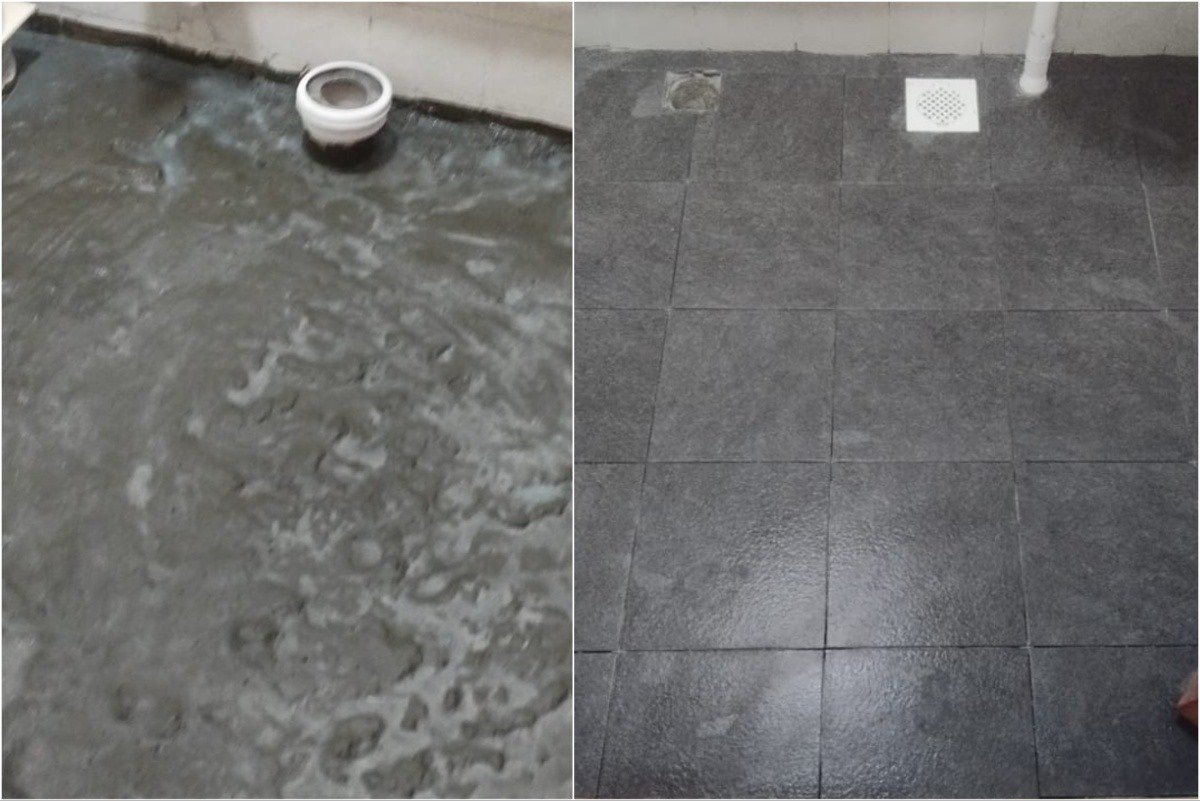
Practical Repairs, Professional Finish – Trusted Tile & Toilet Works Done Right!
At Tech Pay Solutions, we specialize in solving everyday home issues with skill, speed, and precision.
Our client at Choa Chu Kang Avenue 4 requested urgent repairs for their toilet flooring, and
we completed the job with high-quality materials and workmanship — restoring safety and
comfort in the space.
Scope of Work Completed:
- Removed and reinstalled the WC unit safely and securely.
- Hacked and disposed of the existing bathroom floor tiles (50 sqft).
- Applied waterproofing and performed screeding where required to ensure proper surface prep (50 sqft).
- Supplied and installed new bathroom floor tiles (50 sqft) with strong, clean finishing.
The result? A freshly restored bathroom floor with enhanced durability and function —
completed neatly and efficiently.
The client appreciated the smooth coordination and professional approach from start to finish.
Need help with toilet tile issues or bathroom repairs?
Trust Tech Pay Solutions — your go-to partner for clean, lasting, and worry-free results.
- Active
- May 02, 2025
- The Cape,25 Amber Ro...
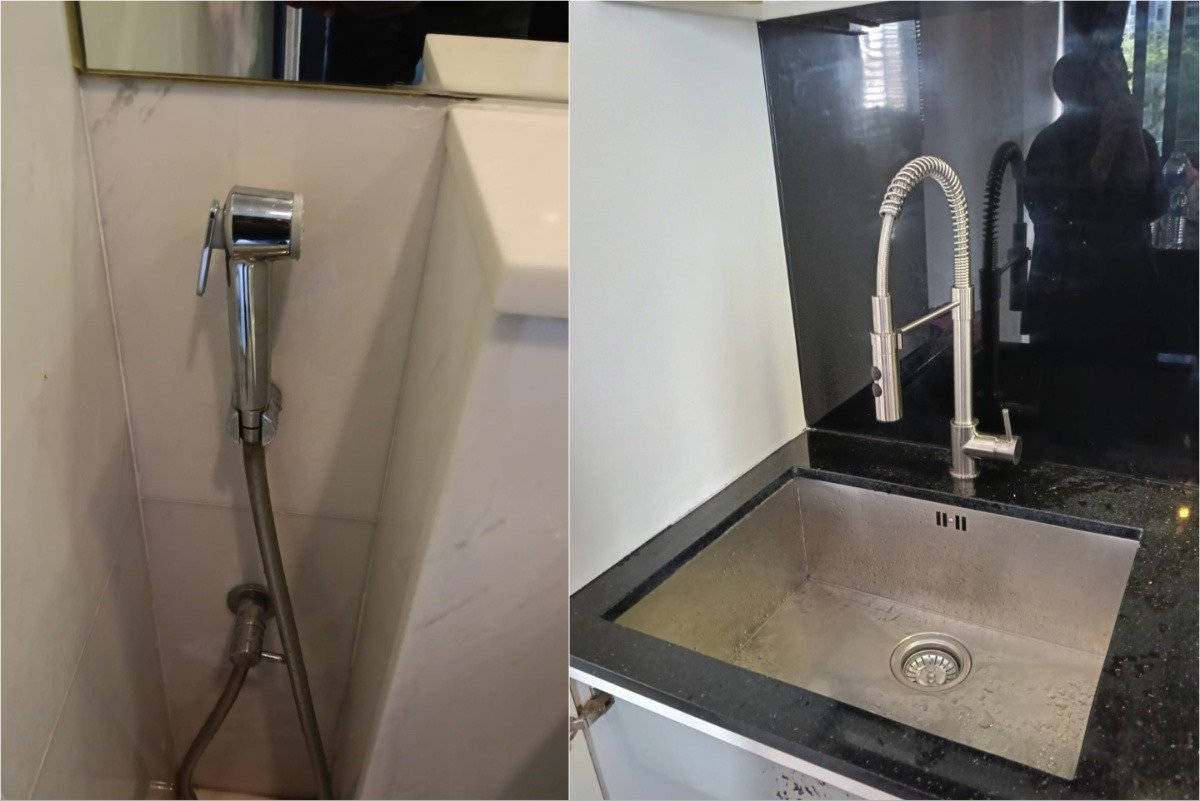
Shine That Lasts – Granite & Marble Surface Polishing with Premium Fixture Installation!
At Tech Pay Solutions, we’re committed to reviving your surfaces with precision and style. Our client at Amber Road engaged us for granite and marble polishing works, along with a kitchen tap replacement — and we delivered a polished, modern result.
Scope of Work Completed:
- Grinding and polishing of the kitchen granite countertop.
- Vanity top polishing in both the master bathroom and guest toilet covering 160 sqft of marble surface.
- Removal of the existing kitchen tap and installation of a new VIMMERN mixer tap (stainless steel finish)
The result was a refreshed and gleaming surface finish across key areas of the home, plus a sleek, upgraded kitchen fitting. Our client was extremely pleased with the quality, clean execution, and detailed care throughout the process.
Looking to restore your stone surfaces or upgrade fixtures?
Trust Tech Pay Solutions — where expert polishing meets modern living.